
How to Properly Maintain Image Sizing on Your Website

By Mike on December 16, 2023 in Development PaperStreet Speed and Functionality Web Design
Images are integral to nearly every website design, and at PaperStreet, we offer clients the ability to edit, update, and replace most of these images at will. But with the power to swap out images comes added responsibility. Inappropriately-sized images can not only look unprofessional, but can impact website performance in surprising ways.
After reading this article, you’ll better understand how to determine the proper image sizes for your photo uploads. By following these guidelines with every image, your website will remain looking, and performing, at its best – even years after launch.
A Primer on Image Sizing
There are two key aspects to consider in image sizing:
- File size: This indicates the amount of disk space the image occupies, typically in a measure of kilobytes (KB). We want as small as possible
- Pixel dimensions: This refers to the actual size of the image on the screen, e.g. 500 by 500 pixels (or “500 x 500px”). We want appropriately sized for the page
These are separate but correlated concerns. Generally, a larger image, made up of more pixels, requires more disk space (it has a larger filesize). Larger images — those that require more kilobytes to store – take longer for website visitors to download, consume more server and client-side bandwidth, and negatively impact website performance. Thus, smaller image files are always preferred.
Then there’s the issue of pixel size. In short, we want images on the website to be appropriate to the space they occupy on the actual page.
Let’s pretend an image is styled to fill 500 by 500 pixels in the web browser. We could upload an image of any size to take its place, but there are many possible outcomes, good and bad, based on the size of the new image. Let’s consider different outcomes with letter grades.
Ideally, we have a 500 x 500px replacement. This will fill in seamlessly for the old image – a perfect swap-out. Giving a grade, it’s an “A.”
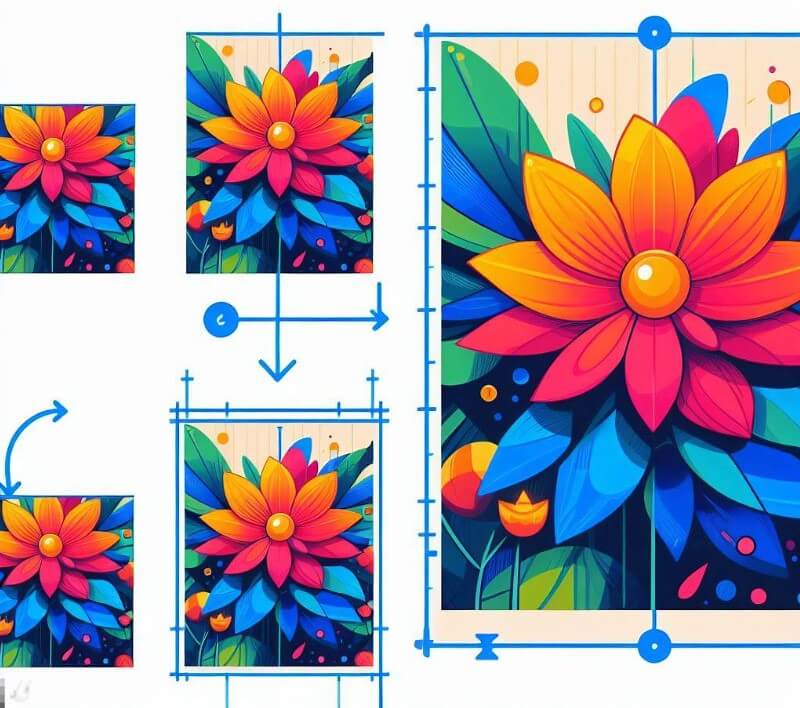
A “B” is something close in pixel size, and proportionally accurate: Say a 700 x 700px or 400 x 400px replacement. Notice these example sizes maintain the 1:1 or square aspect ratio. But because the pixels aren’t a precise match at 500 x 500, the image will either require extra filesize than needed (if larger), or be slightly scaled up, resulting in reduced image quality (if smaller). Generally, though, website users might not be impacted at all.
A “C” is relatively close in desired pixel dimensions, but proportionally inaccurate: Say a 350 x 500px or 500 x 200px replacement. First off, these are rectangles, not squares, and we need squares. Images of the wrong aspect ratio (or pixel proportions) will awkwardly fill website space and look poor. Visitors will notice something is off.
A “D+” is proportionally accurate, but far larger than needed: Say a 2500 x 2500px replacement. On the positive side, this image will be capable of scaling down and generally achieving the desired appearance on the page because it is of the right ratio. Unfortunately, it will require so much more of a download than the original image that the replaced image is a net negative to web performance.
A “D-” is proportionally accurate, but much smaller than needed: Say a 45 x 45px replacement. This will be upsized on the screen and appear terribly blurry looking, a true eyesore. As a small silver lining, it won’t be a large file!
A failing (“F”) image upload is one that is proportionally inaccurate and grossly oversized/undersized. These are nightmares for the webpage to display gracefully, and can demand significantly more filesize than is necessary. Let’s avoid that with our rules going forward.
Where Images Are Updated
To get started, you must have access to WordPress on your website.
Navigate to a page you wish to edit. Most often (especially on the homepage) our developers will build custom fields into the template that allow you to swap out images.
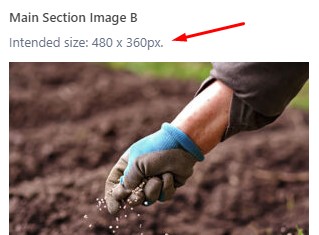
Custom fields often provide details on the proper image size to use. This is the clearest direction to follow when determining what image size to use, and if such direction is provided, these pixel dimensions should be strictly adhered to.
On templates that do not utilize Image custom fields, it is frequently the case that WordPress’ default “Featured Image” will determine the page-top, full-page-width banner at the top of the page. These are typically uploaded as “full width”, 1920px by something like 300px or 500px in height.
Determining Proper Image Dimensions
There are a few ways you can find the proper pixel dimensions for an image in question, starting with most preferred:
- Check the custom field instructions. PaperStreet developers, when providing clients the ability to swap out images, will often enter as a custom field text description what image pixel dimensions the upload expects. Sometimes, the location where the image is uploaded will even have rules in place that automatically enforce images of specific sizes for upload — in other words, without meeting the pixel size requirements, replacing the image won’t work. These guardrails make finding the proper image size much easier.
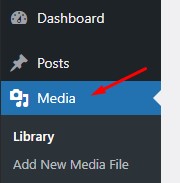
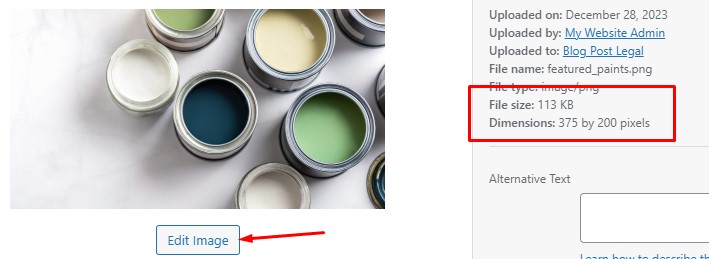
- Locate the image in the Media Library, then use the same size. If the custom field doesn’t provide direct guidance on the pixel size to use, it’s best to rely on the size of the existing image as your guide. Scroll through the WordPress Media Library, where images are uploaded, and find the image you’re replacing. By clicking an image, file information including pixel dimensions are shown.
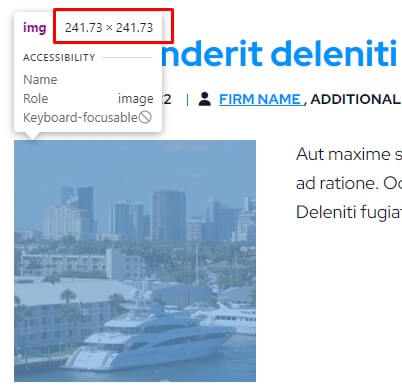
- Use DevTools. This is an advanced tip, but be aware that any website user (you, too!) can open the developer tools on a webpage with the shortcut Ctrl + Shift + C (that is in Chrome, on Windows PCs). This creates a highlighting effect on the page that you can use to hover the image in question, revealing its pixel dimensions. Alternatively, you can locate the <img> element in the HTML document and open the image directly. The image size of the existing image is the size you want.
- Ask the web developer. At PaperStreet, we’re always in active communication wtih our clients, wehther your website launched last week or yeras ago. We’re glad to help you replace any images, or provide you guidance to do so yourself.
How to Edit Images
The idea behind image editing is to start with an image that you then put into software to crop and resize it for use on a website. Editing images is beyond the scope of this article, but there are more and less complex ways to do so.
The advanced way is to use image editing software. Professional software like Photoshop can be used to resize and crop images, just as well as some online software like Photopea.
It’s easier to use WordPress’ built-in Media Library to crop and upload new versions of images.
Remember to Compress
After any photo edits, we strongly recommend putting the image through a free image compression tool like TinyPNG (https://tinypng.com/) or compress-or-die (https://compress-or-die.com/) which will slim down the file and make it friendlier for website visitors to download. Tools like these can frequently reduce file sizes by 75% or even 90% (!) while maintaining top-notch quality.
Better-compressed images mean a faster website, and a faster website gets more attention from search engines as well as visitors.
Use Images Wisely
By following these guidelines for file size, pixel dimensions, aspect ratio, and compression, you’ll ensure that your images enhance your website’s performance and visual appeal, leading to a better experience for your visitors.


