
Get to Know your Visitors Better with Event Tracking and Google Analytics [Guide]

By David on July 26, 2018 in Google Analytics and Reviews
 In this post, we will show you how to setup Event Tracking with Google Analytics for your website.
You will be able to track how certain elements of your website are interacted with (i.e. how many times a button or link was clicked) that is not part of standard reporting by Google Analytics.
Capturing this data will allow you to better understand how visitors interact with your website and if they are performing the actions you want them to during their visit.
You must have an active Google Analytics account and the correct tracking code added to your website. This allows the data to be sent from your website to Google Analytics.
Step One – Decide on What to Track
You’ll need to decide what elements of your website you want to track. Here’s a list of ideas to get you started:
- Call to action button
- Outbound links to other websites
- PDF or other types of media downloads
- Videos
- Image slider/carousel
- Phone number clicks
- Social media buttons
- Forms
Step Two – Setup your Event Tracking Structure
Before you start, it’s important to understand the different data components that will be passed to Google Analytics when an event happens. These are category, action, label, and value.
The following table summarizes the different event fields:
| Field Name | Value Type | Required | Description |
| Category | Text | Yes | Typically the object that was interacted with (e.g. ‘Video’) |
| Action | Text | Yes | The type of interaction (e.g. ‘play’) |
| Label | Text | No | Useful for categorizing events (e.g. ‘Fall Campaign’) |
| Value | Integer | No | A numeric value associated with the event (e.g. 42) |
Before implementation, you will need to define a structure on how your events are going to be setup and what names you will be using for category, action, label (optional but helpful) and value (optional as well) for each element.
Here’s an example of what we would use if a visitor clicked on a downloadable PDF link:
- Category: PDF Download
- Action: Click
- Label: [Insert Name of PDF]
- Value: N/A
Step Three – Add Event Tracking to your Code
Depending on the type of Google Analytics tracking, your code implementation will vary.
View the source code of your website and inspect your tracking code to see what version you have installed. It will be one of the types listed below. We will show examples for each type of Google Analytics tracking code.
- ga.js
- analytics.js
- gtag.js
You will then find the existing code of the button or link you want to track and add additional event tracking code to it. Then upload the changes to your web server.
The code below corresponds to the example used above with a downloadable PDF link.
The bold and italicize part of the code corresponds to the event tracking and the red words correspond to the structure and names which were previously defined.
For ga.js your code would look like this:
- <a href=”file.pdf” onclick=”_trackEvent(PDF Download, Click, Insert Name of PDF, Value)”>Download PDF</a>
For analytics.js your code will look like this:
- <a href=”file.pdf” onclick=”ga(‘send’, ‘event’, ‘PDF Download‘, ‘Click‘, ‘Insert Name of PDF‘, ‘Value‘);”>Download PDF</a>
For gtag.js your code will look like this:
- <a href=”file.pdf” onclick=”gtag(‘event’, ‘Click‘, {‘event_category’:PDF Download‘,’event_label’:’Insert Name of PDF‘ ,’event_value’:’Value‘});”>Download PDF</a>
Step Four – Testing your Event Tracking
In order to test that event tracking is setup properly, you will need to login to your Google Analytics account. Make sure you applied the correct format for your Google Analytics tracking type. If not, it won’t work.
- Click on “Real-Time” and then “Events” in the left side bar menu
- Visit the website yourself and click on a button or link that has event tracking installed
- If you successfully set this up, you will see data appear on this page and the event will fire
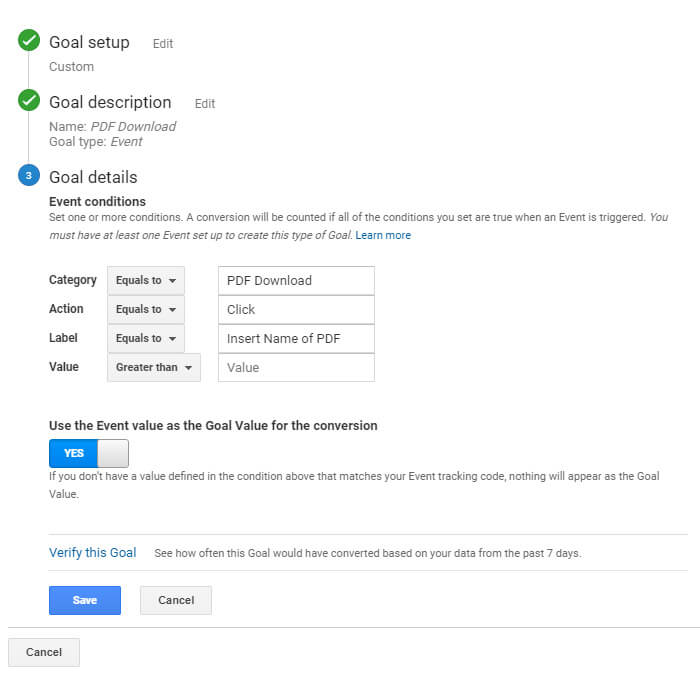
Step Five – Setting up Goals (Optional)
If you want certain interactions to count towards a conversion in Google Analytics, you can setup a goal that corresponds to the fired event.
- Login to Google Analytics
- Click “Admin” in the bottom left corner
- Click “Goals” under the 3rd column
- Click “+New Goal”
- Select “Custom” and continue
- Add a name for the goal
- Click “Event” and continue
- Populate the fields accordingly (Category, Action, Label, Value) based on the code added for the event tracking
- If you would like to track all events within a certain Category then only fill out that field. For example, if you wanted to track every PDF download.
- If you wanted to track only certain events then make sure to fill out all fields that correspond. For example, only a PDF download for a certain whitepaper.
- Then “Save” your goal
Further Learning
Are you interested in learning more about legal marketing? Head on over to our SEO Guidelines & Best Practices page. Our guide will teach you the do’s and don’ts for law firm SEO along with what we include in our SEO plans.
Questions or Feedback?
We hope this blog post has been informative for webmasters and that want to better track visitor interactions with their website.
We would love to hear your feedback if this blog post has helped you. Please feel free to let us know in the comments below.
If you need any assistance setting up event tracking on your website, we are here to help. Please feel free to contact us.


