4 Essential Gutenberg Tips to Power Up Your WordPress Writing

WordPress started as a blogging platform and is now a do-it-all content management system. It has come a long way, particularly in its content writing tools. In 2019, the WordPress writing experience was revolutionized with the introduction of its so-called “Gutenberg” editor.
If you’ve used WordPress in years past, this change might have been jarring. But with further development in the feature set and user experience, we at PaperStreet can confidently state that Gutenberg is the way of WordPress’ future. Learning to make the best use of this editor can help you save time in producing content that will help your firm reach a larger audience.
In this post, we’ll cover the Gutenberg basics and then dive into slightly more advanced tips to supercharge your editing experience.
Everything is Blocks
The first thing to know about Gutenberg is that everything is a block. Each element of your content—be it a paragraph, image, heading, or even a custom-coded shortcode from your developer—is a separate “block” in the document.
This modular approach offers immense flexibility and control over your post’s layout.
What used to require complex HTML coding can now be achieved with simple clicks and drags, pulling from a library of ready-to-go block types. You can, for instance:
- Add an image gallery to showcase your photos
- Embed a YouTube video directly into the middle of content
- Insert a call-to-action button
- Create columns to organize text and media side by side
- Add a quote block to highlight important statements
- Include a table to display data neatly
In the past, all of these edits would have taken a developer’s expertise or your own tinkering with plugins or shortcodes.
Blocks are intuitive and powerful, even if they take some getting used to. On that note, let’s explore some specific tips.
Tip #1: Slash to Search
Need a certain block type, like a list? Don’t click around or sort through menus every time you want to add one. Press “/” (forward slash) and then simply search for it. Need an image? Type “im”; a list? Type “li.”
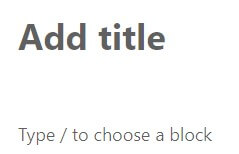
Funny enough, this is the first suggestion you see when the editor opens up to a blank page!
How to use it:
- Place your cursor where you want to add a new block.
- Type “/” (forward slash) to activate the block search.
- Start typing the name of the block you’re looking for.
- Select the desired block from the filtered list.
Fewer clicks means more efficiency. Give it a try, early and often.
Tip #2: Use Document Overview for Better Content Organization
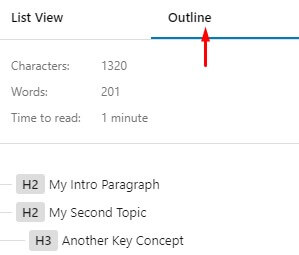
The Document Overview feature is a way to zoom out and see your page content at a glance, much like an outline. You can access it with the pictured button found in the top-left of the editor, or use the shortcut Shift+Alt+O.

We like Document Overview for a couple key reasons. First, it makes moving blocks around easy. In fact, you can do almost anything to the blocks from the Document Overview perspective, like delete or transform (more later!) them.
Next, it lets you review your use of headings for proper structure. The Heading Level 2 should be used as “top-level” titles, and then Heading Level 3 breaks it down further from there. The “Outline” tab of the Document Overview shows your use of headings clearly, in addition to more other useful stats.
This feature is particularly useful for longer posts or pages where scrolling through the entire document can be time-consuming.
Tip #3: Explore Block-Specific Customizations
Every block in Gutenberg comes with its own set of options, allowing for detailed customization without the need for custom CSS or code editing.
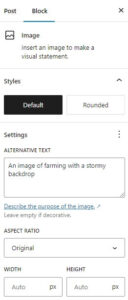
These options are context-sensitive, meaning they change based on the type of block you’re working with. Paragraph blocks offer options for text size and color, while image blocks show settings for alt text, size, alignment, and even rounded edges. One example of an interesting tweak you can make (again, without code) is to select the “Drop Cap” option for paragraph blocks to create visually striking first letters in your content.
To access these options:
- Select the block you want to customize
- Look at the right-side panel and click on the “Block” tab
- Explore the various settings and options available for that specific block type
Some of these options were unthinkable before Gutenberg allowed access to not only blocks but block-level customizations. Should you desire such functionality, it is available.
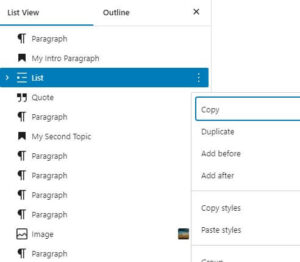
Tip #4: Swap Block Types
For a final tip, know that Gutenberg is flexible. Even once you’ve selected a block and entered content into it, it can be transformed at will. The “Transform To” button lets you change a block type to another.
Say you’ve written a paragraph, and in the middle of your fifth sentence, you realize this has run longer than expected. As you review your content, you think it would work better as a list. Instead of retyping everything or copying it into lists, simply convert your paragraph into a list block.
![]()
How to transform:
- Select the block you want to change
- Look for the “Transform To” button in the block toolbar
- Choose the new block type from the dropdown menu
- Watch as your content seamlessly adapts to the new format
This functionality saves time and encourages experimentation with different content formats.
Gutenberg Is Here to Stay
It is our opinion that Gutenberg is a modern, capable, and flexible editor that is here to stay. Month by month, year by year, it becomes a more feature-rich content editor at the cutting edge of what is possible in blogging. When producing content for your business, having the best tools gives you an edge; it’s just one reason we like to build websites for our clients in WordPress.
By mastering these four tips—block search, block customizations, transformations, and the Document Overview—you’ll become comfortable and efficient when working in today’s WordPress. The key will be experimentation and practice. Of course, should you ever run into any difficulties with content edits, you can reach our support staff at helpme@paperstreet.com.
About Us
Did you know more than 200 clients have worked with PaperStreet for more than 10 years?
Get a Free Website
Analysis and Consultation
Marketing Services